Import Results
Overview
Compusense is a data collection software that provides a wide range of analysis options and tools within individual tests and across multiple tests .
For all your scenarios where you intentionally collected data in different tests, such as for shelf-life studies (separate tests for each time point is the recommended method for shelf-life studies), or scenarios where you collected data in different tests because maybe you were not aware that you can collect data in multiple different speaking regions into one test , as an example, you can use the Advanced search & analysis across tests feature to run analysis across multiple compatible tests and/or sections.
Even though we have great tools that enable you to analyze data across multiple tests, there are sometimes scenarios where you might find it useful to import data into a single test. Example scenarios:
- Scenario 1: Bringing data from outside of Compusense. The data may have been collected outside of Compusense, perhaps by an agency that uses different data collection method and has provided you with the raw data in Excel. You would prefer to keep and analyze the data using Compusense rather than using another statistical package.
 Did you know that you can provide your panelist URL to an agency to collect data with their panelists into your tests? Contact our Support Team for more information.
- Scenario 2: Combining data from Compusense tests (all tests sample related). You have two or more tests that practically have identical questionnaire and samples. You find that in this particular situation you would benefit from the analysis offered within a single test vs. analysis across tests.
- Scenario 3: Recovering deleted results. By mistake you deleted results out of a wrong test by reopening the test for editing. You were sure that you were in a test with testing data, but turned out you were in a test with real data. It happens, we are all human.
 Please note that the data intentionally deleted in the Results > Advanced > Delete sample sets area cannot be recovered.
If you have a scenario not mentioned above, and you would like to share it with us, please reach out to our Support Team ; we would love to hear new and different ideas from you!
In this workflow we are outlining the steps for:
- Preparing the test for each of the above mentioned scenarios.
- Preparing the file for data import.
- Importing results.
Before You Begin
The importing file and the test you are importing into will have to have the following in place:
- Matching questionnaire. The question names, attribute names and choice labels have to be identically named and be in the same order in both places.
- The number of samples must match.
- The test has to have at least the same number of sample sets as the importing file.
- The panelists in the test must match those in the importing file.
Please note these additional important details:
- Question compatibility. Not all question types are compatible with this feature. In other words, if your test contains a question that is not in the list below, its data will not be imported (it will be ignored), while other compatible questions' data will import successfully if formatted properly.
The compatible question types (both demographic and sample related) are: - Category scale
- Line scale
- LMS
- "Choose" questions
- Comment
- Numeric
- Rank all samples, Rank all concepts, Rank n samples, Rank n concepts
Rank questions with piped choices are not compatible at this time, and Rank concepts questions (both all and n) that use incomplete block design for choices are not compatible at this time.
The software will inform you when your test contains questions that are not compatible with the results importing feature. An example list of warnings can be like this:
- Other test components compatibility. Data import is compatible with tests that have the following in place:
- Sample sets must be available. If a sample set in the test is in progress or set to complete, it will not
be possible to import data into it. All sample sets expected to be
imported must be available for evaluation (as seen in the Results tab).
In other words, their status has to be Not started , as seen in the Logistics > Sample set options > View .
Sample sets in the test with data in them will be ignored. If all you need to do is update one or two sample sets that already exist in the test, you can use the Edit results feature found under Results > Advanced .
If however, you are trying to update some sample sets along with importing new ones, only the new ones will be imported while the sample sets with data in them will be ignored. If you wish to update existing sample set data together with the new sample sets, it can still be done by following the steps for the scenario 2 in this workflow.
- Non-sample or sample related data. If you have both in one test, additional file formatting needs to take place.
- The design has to match if you are considering the first position effect in your analysis. In other words, sample position in the file needs to match the sample position in the test if you want to split data based on the first position. Otherwise you do not need to include the Sample position column.
- Single section tests are compatible. If your test has multiple sections, contact Compusense Support Team to see if anything can be done.
- Tests with no reps and tests with multiple reps are compatible with data import.
- Partial Present feature enabled or disabled is compatible with data import.
- Sample set binding options set to Panelist receives next available sample set or Panelist enters code to receive sample set . The Sample set pre-assigned to panelist option is not compatible with data import.
- File type. The data can be imported from a:
- .csv file type. Useful for data containing only characters found in the Latin alphabet.
--or
- .dat file type. Useful for data containing characters not found in the Latin alphabet. For example, Cyrillic languages, Asian languages, languages written from right to left, etc.
Data completeness in the file. The importing file can have partial data in it, but once imported, the sample sets that had partial data will be marked as complete. Make a backup. Before making any changes to any tests and their data, make clones of the tests with results and name them well so that you know that these are for backup purposes.
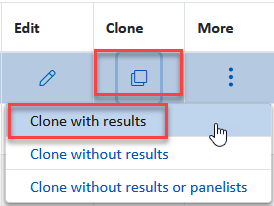
Try first. Because the questionnaire and samples have to match very precisely, and panelists in the importing file need to exist in your test, it is possible that the first attempt to import data will not be successful. For this reason, we recommend making a new, "clean" clone of your test when you are ready to attempt results import, and naming the clone well for easy distinction. In this case you will want to use Clone > Clone without results option.
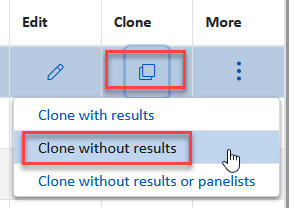
You can start with one sample set and if that worked, then you will know how to format the remainder of the data. You can use the same test for the final import, or you can choose to create a new "clean" clone for the final import.
Prepare The Test for Import
Different scenario will require slightly different steps for test and file preparation, but the data import steps are identical for all scenarios. In this section of the workflow we are describing the test preparation steps for different scenarios mentioned earlier.
Use the navigation bar on the right side of this page to jump to the portion of this workflow that applies to you.
Scenario 1: Bringing Data From Outside
of Compusense
The Scenario: Let's suppose that all of the data was collected outside of Compusense,
perhaps by an agency that uses different data collection method, but you would prefer to keep and analyze the data using Compusense.
At this time you do not have anything set up on your side for this data.

You might have a similar scenario that does not involve an agency but still can follow the same idea.
The solution:
- Create a test. You need to create a test in Compusense that has the exact same: questions, attributes, choices, number of samples, the same number of sample sets or more, and the panelists in the test need to be the same as those in the importing file.
Very likely the panelists used by the agency will not exist in your library. In this case we recommend adding your own guest panelists into your test and then the panelists in the file provided by the agency can be substituted with your guest panelist codes.
- Download pre-formatted import file.
- Format the importing file .
- Import the data .
Scenario 2: Combining data from Compusense tests (all tests sample related)
The Scenario: You have two or more tests that practically have identical questionnaire
and samples. However, when originally creating the tests, you didn't know that
you could have different panelists from different regions in the same
test, that you could run the same test to different parts of the world, and to collect data in this same test. Therefore you ended up with data in multiple tests. You find that in this
particular situation you would benefit from the analysis offered within a
single test vs. analysis across tests.
If ever unsure whether something can be done in Compusense, please reach out to our Support Team to find out!
If ever unsure whether something can be done in Compusense, please reach out to our Support Team to find out!
This is a perfect scenario where very minimal test and file preparations are needed.
The solution:
- Clone a test with most results in it, without keeping results. To save you a few clicks, it is most efficient to clone a test that has most number of panelists that have results in the test.
For example, if combining results from three tests, and if one had 75 results,
another 38, and the third 120, you would want to work from a clone of
the third test.
Make sure that you have more than enough sample sets in the clone to combine all the results in it. In our example with three tests (please see above), the minimum number of sample sets we would need in the new clone is 233 (75 + 38 + 120), so adding 240 is just fine. It is better to have more than enough than not have enough sample sets.
- Add panelists from other tests into the clone. The clone that you just created has to have all the panelists in it that have results in all the individual tests that you wish to import data from.
The fastest way to find them is by exporting raw data from the other tests, making sure to include Username or Panelist Code (whichever of the two headings is available to you).
From the exported files, copy the usernames. Back in the test that you will be adding all panelists in, select Add panelists > Find panelists to add .
Search by the Username or Panelist Code (whichever of the two headings is available to you), use the equal sign ("=") operator, paste the usernames (codes) in the search criteria and click Apply .
Once you find the right panelists, select them and click Add selected . Repeat for all the panelists from all the tests that you wish to import data from.
- Export results from the original tests. You need to export results from all tests that have data in them that you wish to combine into a single test.
- Format the importing file . In this perfect scenario, there shouldn't be a need for any special formatting. Once you handled the sample sets and panelists, the assumption is that all other aspects of the test are identical to those that hold the original data. You can import data from separate files, one from each test (a more efficient approach), or if you wish, you can combine the data from all the exports into one importing file (requires slightly more work on your side).
- Import the data .
Scenario 3: Recovering deleted results
The Scenario: By mistake you deleted results out of a wrong test by reopening the test for editing. You were sure that you were in a test with testing data (preview data, not collected by panelists), but turned out you were in a test with real data. It happens, we are all human.
This is the screen you deleted the results from (the Run test ):
The software does warn you that the results cannot be recovered, but we recognize that in this particular screen users might click buttons in a hurry, so we capture those results for you, just in case. In this workflow we describe how to recover that data.

Please note that the data intentionally deleted in the Results > Advanced > Delete sample sets area, cannot be recovered. This is because it takes an extra effort to delete the data in that area, which reduces the possibility of accidental deletion. Therefore, there are no backups available, unless you created a clone of the test keeping results in it prior to deleting the data.
The Solution:
- Export deleted results.
- Go to the test where the data was deleted by clicking the Delete results button in the Run test tab, and go to the Overview tab.
- On the far right, in the Test information area, click Audit trail .
- In the Audit trail screen, select the event that in the Reason columns indicates Results deleted due to test disassembly .
- Click Download multivariate results .
- You may make a clone of your test without results, but since the results are deleted anyways, you don't have to.
- Import the data . The data you downloaded will already be in the proper format, so you will not have to do anything special before importing it back into your test. The compatibility rules apply.
Prepare the Data File For Import
If the scenario #3 (Recovering deleted results) is your scenario, you do not need to do any file preparations for the import. You may go directly to the steps for importing data into your test.
The best way to prepare a data file is by exporting the required format directly out of Compusense. A file exported out of a Compusense test will have the right headings format and the data format under those headings to guide you.
Please follow the steps below to export data (or just headers) and prepare the file for import.
Download pre-formatted import file
Compusense provides a pre-formatted file download that corresponds to your specific test setup. This step is ideal for all scenarios where sample position effect is not a concern. If you will be analyzing data for the sample position effect, please follow the next set of steps instead.
- In your test, click Results > Advanced > Import results.
- From the Download pre-formatted import file list, click the file format you wish to use:
- As a .csv file.
This file format is useful if your test is set up in English or another language that uses all the same characters as English. - As a .dat file.
This file format is useful if your test is set up in a language that uses some characters not found in the English language. E.g. Cyrillic languages, languages with accents and other special characters attached to some letters. - As a .dat (unicode) file.
This file format is useful if your test is set up in a language that uses script. Example, Asian languages, RTL (right to left) languages, etc. - The file will save to your browser's default download location. Open the file and go to the next set of steps to format the file.
Export Headers and One Sample Set

Follow the steps below if you are planning on analyzing imported data for sample position effect. Otherwise, you may skip this part.
- In your test with results (at least one result), click Results > Reports > Create report .
- Select Raw data export - Multivariate and click 2. Select options to expand it.
- If your test has any of the Choose questions in it:
You might see some or all of the options shown on the far left in the image below. Please select the following mandatory options if they are displayed to you : - Under the Questions with single selection , select: Multiple cell output > Label and value > 0/1 .
- Under the Questions with multiple selection s, select: Label and value > 0/1 .
- Under the Test and questions information , select the following mandatory fields (as seen in the above image):
- Section number
- Sample set number
- Rep number
- Question number
- Attribute number
- Question name
- Attribute name
- 'Choose' question comments
If additional fields are selected, they will not affect the import; they will simply be ignored.
- Under the Sample information , select the following fields:
- Sample position - this is optional. If you include this field, you will have to make sure that the sample position in your importing file matches the design in your test. This will be useful if for your analysis you are considering the first position effect. Otherwise you do not need to include the Sample position column, it will require less work when you do not include it.
- Sample number
If additional fields are selected, they will not affect the import; they will simply be ignored.
- Under the Panelist information , select Username . If you do not see the Username , please select Panelist Code .
If additional fields are selected, they will not affect the import; they will simply be ignored.
- Under the 3. Select questions , keep all questions selected for the export.
- Under the 4. Select export type , select .csv file format or .dat, and click Create my report . Download the report and open it in a spreadsheet program, such as Excel. If your test had results, they will be listed; if it did not, you will have only a header row to work with.
To properly open a .dat file in a spreadsheet program, right-click on the .dat file, select Open with and click the spreadsheet program available to you. If none available, click Choose another app , or involve your IT in finding the right program.
Format the Importing File
- Carefully review the file you just exported to familiarize yourself with the format.
For Scenario 1 "Bringing data from outside of Compusense", open and review the data that was provided to you from outside of Compusense. Decide whether it is easier to:
a. Copy the column headings from the exported file and paste them over to the file that contains your external data,
--or
b. Copy segments of data from your external data file and paste into the exported file matching the data with the corresponding column headings.
In either case, you will have to update the panelists to match their usernames with those that exist in your test.
For Scenario 2 "Combining data from Compusense tests (all tests sample related)", the files should already be in the compatible format. It is recommended to import individual files from each test to reduce the amount of work. However, you are welcome to combine all the data into one importing file, but you have to ensure to have only one header row in the file with the data pasted without leaving any blank rows between different segments.
For Scenario 3 "Recovering deleted results", the file can be imported as is, no formatting necessary. Please skip this step and go to the Import Data section.
- Start with one sample set to try the process. In some situations you might find it easier to work with all sample sets right away; it all depends on your specific scenario.Your file might look something like this if your test had 2 samples:The headings must be named in a specific way, and the data has to be in the proper format for each question and attribute.Let's review the columns:
- Optional columns/headings.
If you exported data rather than downloading the pre-formatted file, and if optional headings were included in the export, they will not negatively affect the importing process. They will simply be ignored. Therefore, you can keep them in the file, or you can delete them out of the file if you want.
If you downloaded the pre-formatted file, optional columns may not be included. - Section_Number .
If you exported data rather than downloading the pre-formatted file, this is a required column and it needs to reflect the section number your data belongs to, even if your test has only one section. Please note that it is not possible to import data into tests that have more than one section.
If you downloaded the pre-formatted file, the Section_Number column will not be included. - Sample_Set_Number .
Required column regardless of whether you exported data or downloaded the pre-formatted file. Notice in our example screenshot above that every panelist has multiple rows of data (their sample set repeats); one for each sample that they evaluated.
- Rep_Number .
If you exported data rather than downloading the pre-formatted file, this column is required only in Standard tests (tests with samples). It needs to reflect the rep (replication) number your data belongs to, even if your test has only one rep. In Survey tests this column will be ignored.
If you downloaded the pre-formatted file, the Rep_Number column will be included if the test was set up with reps, and it will not be included if the test was not set up with reps. - Sample_Position .
If you exported data rather than downloading the pre-formatted file, this column is optional. If you are considering the first position effect in your analysis in your Standard tests (tests with samples), then including this column will be necessary. The sample position in the file needs to reflect the correct sample position in the design for each sample set. The actual sample number is found in the next column (see below). Wrong information entered here will affect the analysis even if the import is successful.
If you downloaded the pre-formatted file, the Sample_Position column will not be included. - Sample_Number .
This column is required only in Standard tests (tests with samples) regardless of whether you exported data or downloaded the pre-formatted file. The samples must be listed in the order they appear in the list of samples in the test (in the Samples & design tab), not by the experimental design used. In the example image below, a test had 5 samples, so every sample set would have the samples in the order 1,2,3,4,5.
- Panelist_Username or Panelist_Code (depending on your subscription) .
Required column regardless of whether you exported data or downloaded the pre-formatted file. The importing file has to have the panelist username or panelist code filled with the same information that exists in your test, in the Panelists tab. If any of the panelists do not match, the data import will fail.
- Question, attribute, and choice headings. The headings for questions, attributes, and choices need to be in the following format: question number, followed by attribute number (where applicable), followed by question name, followed by attribute name (where applicable), or followed by choice number (where applicable). Individual components of the headings are separated by underscores (single or multiple). If any of these details are not present in the file, the import will fail. Please be sure to follow the steps for exporting data properly ( scenarios 1 and 2 workflow is different from that for scenario 3 ).
- Save the file making sure that:
- If the file was originally in the .csv file format, you maintain the same format.
- If the file was originally in the .dat file format, you maintain the same format.
- Close the file, and import it into your test.
Import Data
Regardless of the scenario that applies to your data importing needs, the steps to import data is identical, as outlined below.
Please ensure that you prepared your test and the file properly before attempting to import results.
- In your test where you wish to import results into, click Results .
- Select Advanced > Import results .
If your test has any questions in it that are not compatible with the data importing feature, the Import Results Validation are on the page will inform you which questions are not compatible and why. If in addition to the incompatible questions the test contains questions that are compatible, you will be able to import their data.
Here is an example screenshot:
- Click Browse . Browse to the file you wish to import and double-click it to add it to the page for import.
- Click Import results . Each attempt will have the following information displayed:
- Import date .
The date format is as seen in the image below, reflecting your time zone set up in the Settings.
- Imported by .
The analyst name who performed the data import.
- Import progress .
Successful import reflects how many sample sets have been successfully imported compared to how many there were in the file. Failed attempts always show 0 / 0 for the Import progress.
Related Articles
Import Guest Panelists
Overview Generic guest panelists can be useful to have in your Panelists library for various reasons. Here are some: Collecting Mock Results - Guest logins are great for collecting testing (mock) results to fully review analysis options before ...Results and Analysis Review
Overview The Results area allows you to view Graphs and Data, sort Comments and create Reports to download or send to colleagues. There are also advanced features that will allow you to delete sample sets, set sample sets to complete and edit ...Import/Export History
Overview Import/export history provides a list of transaction activities at the panel level, including activity type and its success. Whether you are importing panelists from a file into the Panelists library, or updating panelist information by ...Tests: Results Tab
Overview Every test type has a Results area where you can preview graphical representations of your data, generate summaries or detailed reports on your data within individual tests. Analysis across tests is also possible. Please watch the video ...Import Products from a File
Overview When importing products, it is important to format the file properly and to use unique product codes to ensure successful import. To assist you with these requirements, we made it easier by providing example import files that directly ...